No Bake Energy Bites (aka poppables) My new favorite treat


Oh. My. Goodness.

I love these so so much. Definitively a new fave. 

I have been popping them in my mouth all afternoon. 

I saw these on Pinterest a few days ago and I have been dying ever since to try them. They come from another food blog called 'Smashed Peas and Carrots' which I will be exploring more in the next little while. I finally found time this afternoon and I was so impressed with how fast they were and versatile. You can pretty much use any ingredient that you have on hand as long as you add or subtract the 'sticky' (what else do you call peanut butter or honey?!)

I made this pretty teeny so I or my kids could just pop one of these in their mouths. The only problem, they are made with peanut butter so they can't be sent to school.

Oh well, more for me at home then!


No Bake Energy Bites

1 cup of Dry Oats (I used quick cooking oatmeal because that is what I had)
2/3 cup of Coconut (which I didn't have so I used Sunflower seeds)
1/2 cup of Peanut Butter
1/2 cup of Ground Flax Seed
1/2 cup of Chocolate Chips (I love love love chocolate so you know that I wouldn't say this if I didn't mean it-these are definitely optional. I added them but realized after that they are sweet and tasty enough that you could do without and not miss them at all)
1/3 cup of Honey
1 tsp of Vanilla Extract

Mix everything together in a bowl. I found mine to be a little dry so I added more peanut butter and then everything stuck together much better. 

Chill in refrigerator for about 30 minutes. 

Take out and form into balls. I made mine bite sized/poppable but make them any size you would like. Keep them in an air tight container in the fridge. They would probably be fine out of the fridge but having them chilled is a nice touch. 

Remember that this recipe really can be made with anything you have on hand. Add raisins or other dry fruit, seeds, nuts, hemp hearts...go crazy and make it with what you love and enjoy them. Just make sure to add more 'sticky' or less depending on how much and what you add. 

'Poppable' even for a four year old.


Avocado, on anything

I remember being a kid and watching my dad cut open an avacado, scoop the flesh into a bowl, add some salt and pepper and spread it on toast. I would get nauseous just watching. Well not really but I thought that it was the most disgusting thing I had ever seen. My parents tried to get me over and over to just try it, reassuring me that it was delicious but I just could never make myself try it. I mean, who eats green fruit? (At the time I didn't notice that my favorite fruits were the coveted green apples and also kiwi that my mom didn't often buy)  

I'm not sure when I finally got the guts to try eating an avocado. I know it was well into my adult years and now I can't figure out what I was so chicken about. I LOVE avocado now. Love it. On any and everything. 

How do you like to eat avocado?

(added last minute to black bean quesadillas)

Garlicky Kale; So Good!


Looking for a new way to eat Kale? This is a super fast and delicious side. Make it, eat it, love it.

1 TBSP of Olive Oil
1 Garlic Cloves, thinly sliced (I minced)
small bunch Kale, stems trimmed, chopped 
1/4 tsp of Salt


Heat a large frying pan over medium-high. Add oil, then garlic, (smells good).
Cook for 1 min. Add kale and salt. Cook, stirring often, until kale is tender and wilted but still bright green, 3 to 4 minutes. 

Serve. 

I didn't know that Kale would be good served hot but trust me, it is. 

A Good Day for Vegetarian Cuisine Around Here:Fettuccine with Sweet Pepper-Cayenne Sauce

I love it when food goes so right. That is exactly what happened the other night when I was eating the amazing meal I made for my family. Yup, I'm saying it, I was pretty much the best cook ever one cold evening last week. I bet you wish you had been here for dinner, don't worry, next time you are invited!

I hate it when I can't figure out what to make for supper. A lot. It was 4:00 and I had no idea what I was going to make yet when I decided to check my email as a distraction. It turned out to have been a good idea because I had an email from Chatelaine with a bunch of different vegetarian meals. There was a good looking one with Quiona and Chickpeas but it just didn't look filling enough so I kept on hunting until I found 2 recipes that got gobbled (yup, gobbled) up by both kids, a comment from Hazel that sounded close to "This is so good it feels like I'm at a restaurant!" and Aaron eating until there were no leftovers. And there was a lot of should be leftovers.

Fettuccine with Sweet Pepper-Cayenne Sauce

1/2 a box of Fettuccine Pasta
1 TSBP of Olive Oil
2 Sweet Red Peppers, sliced into bite sized pieces
3 cloves of Garlic, minced (or 3 tsp of minced garlic)
3/4 tsp of Cayenne Pepper (I knew kids would be eating this so I only used 1/2 tsp)
1 cup of Sour Cream
3/4 cup of Vegetable Broth
3/4 cup of Grated Parmesan Cheese
salt and pepper to taste

Bring a large pot of lightly salted water to a boil. Add pasta and cook for 8 to 10 minutes or until al dente; drain.

Meanwhile, pour Olive Oil  into a large skillet and saute red bell peppers, garlic and cayenne pepper over medium heat for 3 to 5 minutes.

Stir in sour cream and broth; simmer uncovered for 5 minutes. Remove from heat and stir in cheese.

Toss hot pasta with sauce and season with salt and pepper to taste; serve.

That is it! So fast and so delicious. 


Moms Fluffy and Yummy Waffles

I love waffles. When we moved from Ontario back to Alberta we made sure that we booked hotels that had a breakfast included in the room price.

This was for a couple of reasons; first, so that we didn't have to try and find breakfast in 5 different cities, second, so we didn't have to budget any more meals in to our adventure and third, so I could eat waffles. Well, maybe that was just a bonus but often hotels with continental breakfast have a waffle maker. I ate waffles every morning I could. 

I have been wanting a waffle iron for a while but every time I would mention it to Aaron he would make some comment about how I didn't need more kitchen appliances, or where would I store a waffle iron? Those concerns meant nothing to me but I still never went and got myself one. This year though I think I must have mentioned it a little more often than usual because when his sister asked him what to get me for my birthday (the big 3-0!) he told her a waffle iron and guess what? She got me one! YAY!!!!

As soon as I could (as in as soon as I went and bought milk) we had waffles. My mom gave me her recipe that she swears in the best and I have to agree with her. 

What do you think?

Mom's Fluffy and Yummy Waffles

2 Eggs
2c of Milk (go buy some right now if you need to)
2c of All Purpose Flour
1 TBSP of Baking Powder
1/2 tsp of Salt
1/3c of Cooking Oil (I use Canola)
1 TBSP of White Sugar

Ok, these take a little bit of work but they are worth it.

Separate your eggs. 
Beat the egg whites until stiff and set aside.

Mix yolks with the remaining ingredients and then gently fold in your egg whites. 

Cook as directed for your waffle iron. 


Aaron informed me when I told him we were eating waffles for dinner that night that he didn't want to have plain old syrup on his waffles. Well, okay then! When I was growing up my mom would make waffles and my favorite way to eat them was with vanilla ice cream on top. It would get all soft and melty and be so delicious. Sometimes I would add strawberries or other fruit to the sweet meal but usually I stuck with just the ice cream. But of course I didn't have ice cream, so I got creative...

Hot Vanilla Syrup
2c of Milk
2 TBSP of White Sugar
2 tsp of Vanilla
2 tsp of Corn Starch

Mix all ingredients in a saucepan and heat until it comes to a boil, stirring the whole time as milk can scorch.  Turn heat down and simmer until it reaches desired thickness. 


This was so yummy and subtle.  It was so good when it was also served with the strawberry syrup I made...

Fruit Syrup for Waffles of Pancakes

2c of frozen fruit (I made two kinds, strawberry and blueberry)
1 TBSP of White Sugar (feel free to add more if you want your syrup sweeter)
2 TBSP of Corn Starch 

Follow the same directions as used for the vanilla syrup: 
Mix all ingredients in a saucepan and heat until it comes to a boil, stirring often.  Turn heat down and simmer until it reaches desired thickness. 


I cooked my waffles while I was making these syrups and while it was a little crazy, it was one of the best meals I've had in a very long time! Thanks Chel!


I'm Ashamed (and Quinoa Greek Salad)

I know I said I was back before. But I unintentionally lied. Sorry. I really didn't mean to abandon you and myself because really, I started this blog originally for me to keep track of the vegetarian recipes that I had made. I've been thinking about getting back to blogging food for a while but the truth is that I really haven't been cooking the way that I did before we moved home. I have been in a bad food rut.

I think it began with the move and being in transition for so long between leaving Ontario and getting settled here at home and then I got pregnant with Simon which then ended in a c-section and then school started again and ballet and soccer and and and ... here we are.


But I really haven't meant to be such a food slacker or a food blogging slacker. I've actually been walking around saying things like "I want to have something to be passionate about" and "I used to have things that made me excited, what were they?" It sounds a little pathetic but then my vegetarian sister came to visit and I realized that I really like cooking vegetarian meals, and eating beans so I'm back! My life is a little nuts but honestly, I haven't stopped taking pictures of meatless dinners around here so I am going to actually get said pictures blogged and keep also get back to trying new recipes and getting them blogged here. So...here I go!

This is a recipe from back in the spring but that we eat often. 

I love Greek food. This love started in High School when I had a friend whose family had a Greek restaurant. We would meet there on the weekend, eat tzatziki and pita, break plates and then go on with our night. Oh, I'd love some tzatziki right now. 

Quinoa Greek Salad

I really don't have an exact recipe for this...

Cook 1cup of Quinoa (I cook mine in my rice cooker with water, not broth)

While it is cooking, chop up 
1/2 a cucumber
1 tomato
 and open a can of chickpeas or grab some precooked ones from your freezer (I cook my beans and legumes in large quantities and then freeze them in 1 cup portions).
You will also need
1 cup of crumbled feta cheese
1/2 of a red onion sliced 
and kalamata olives (which I often omit because I don't love 'em)
oh, and if you want some chopped green pepper, about 1/2 cup. 

ok, put all of these ingredients into a bowl (a large bowl).

Now it is time to make some dressing.

3 TBSP of Extra Virgin Olive Oil
1 1/2 TBSP of Lemon Juice
1 clove of Garlic or 1 tsp of Minced Garlic
1/2 tsp of dried Oregano
1/4 tsp of Sea Salt (I love sea salt and even was able to visit an island in France to see how it is harvested)
1/4 tsp of Black Pepper (fresh is best)

Whisk these ingredients all together until completely mixed . You can also shake them up in a tightly closed container which could be a fun job if you want to involve your kids in making meals. 
Pour your dressing over your vegetables and Quinoa and serve. I have used this as a side before and also served it as a main meal by eating it in wraps with lettuce and tzatziki sauce which is my favorite way to enjoy it. 


No Bake Granola Bars: SO easy and delicious

A new favorite

My cousin posted a link to this recipe on facebook and I'm so glad I saw it. 

It was such a fast and easy recipe. So fast. And good. And healthy. Healthier and faster than my other granola bar recipe that we love around here. I think I may have to just wean them off of the original and stick with this one. I am just going with the easy route but I am so tired this pregnancy and so easy it is. But remember...healthy too!

I want to apologize about the lack of another real recipe, but this is just what I'm doing right now so enjoy this recipe. Really. Try it. They turned out delish

No Bake Chocolate Chip Granola Bars
Here is a link to the website that this recipe came from.

1/4 cup Butter
1/4 cup Honey
1/3 cup packed Brown Sugar (These were really sweet bars, I recommend cutting this in half, or at least down to 1/4 cup)
2 cups Quick Cooking Oats 
1 cup Crispy Rice Cereal (For some reason my kids love this cereal so I always have it on hand.)
1/2 teaspoon Vanilla
2 tablespoons mini Chocolate Chips
*I followed the recipe ingredients exactly but next time I would cut the sugar and add some more healthy stuff. Maybe some nuts, or dried fruit or hemp hearts

In a large bowl, stir oats and rice cereal together. Set aside. 
In a small pot, melt butter, honey and brown sugar together over medium high heat until it comes to a bubble. Reduce the heat and cook 2 minutes. (I think that you should cook a minute longer. I know that there is a risk in it burning but I think they will hold together better. Mine didn't turn out crumbly but I think they may stick better with this trick).
  Pour in vanilla and stir. Pour over dry ingredients and mix well to moisten all ingredients.
 Pour into lightly greased small jelly roll pan (about 12x8x1) and press out to be about 3/4 inch in thickness. 
(If your pan is larger than this just use one end to get it to the thickness that is stated above.)
Sprinkle with mini chocolate chips and press down lightly (I sprayed my hands with 'Pam' to keep the ingredients from sticking all over me). Cool on a counter top to room temperature for two hours or until the chocolate chips are set before cutting into bars.
I used snack sized zip-top bags for my bars and they fit perfect. 
Here is a note from the recipe I followed:     
 If your granola bars don’t seem to be staying together when you cut them, you may have made them too thin or you didn’t pack them in tight enough. Stick them in the fridge for 20 minutes and that should help keep them together. {Be sure not to keep them in there too long or else they’ll become super hard!} The next time you make them, try reducing the butter to 3 tablespoons and really packing them down.


These bars are seriously yummy. Whip some up right this minute!


Mom's Bread Recipe, and yes, I mean MY mom's bread recipe.

Mom's bread.
 I know that a lot of you are suddenly drooling over the memory of my Mom's white bread but sadly, that is NOT the bread recipe I'm sharing today. 

But honestly, it is just as good or better. I think its better, in case you were wondering. 

When we were living in Kingston I tried to make my Mom's bread and it never worked great so one day we had a Skype date bread making party and that was that. You would think that I would have been a natural since my Mom made bread literally every week my entire childhood but the only thing that came natural to me was coming home and eating half a loaf of with home made honey butter while I watched Full House. 

I got pretty good at making bread in Kingston and as I said before, I made it regularly but then we moved back home and I COULD NOT make bread. Well, I tried but it never turned out. I was sad.  I finally told my Mom that I was a bread making failure and she saved me! She brought me some yeast from the Bosch Kitchen Centre in Edmonton and it made all the difference. I couldn't believe it. 

This week I pulled out my 'Mom Recipe' and tried again and it turned out better than ever before. I think this goes to show that fresh ingredients are best. My Mom has had lots of problems buying yeast from grocery stores because it doesn't last and now I've learned my lesson! Oh, and she said the yeast she bought at the Bosch Kitchen Centre is a better price too. 

Now, onto the good stuff...

Mom's Most Delicious Bread
 (according to moi!)

(Also, I have a Bosch and so this recipe and directions are using a mixer with a bread hook. Also, if you try this with a Kitchen Aid you will NOT be able to make this large of a recipe so cut it in half!)

***This recipe makes 6-7 loaves of bread

Start with 1 cup of Warm Water
3 TBSP of White Sugar
3 TBSP of Yeast (the good yeast)

Dissolve the sugar in the warm water then add the yeast. Let the yeast sit and 'grow' in the water for a couple of minutes. When it is frothy (I guess is the word you should use) toss it into the mixing bowl.

Add 6 more cups of Water (I still use warm
and 4 - 6 cups of Whole Wheat Flour and mix.

Add 1 cup of Quick Cooking Oatmeal (I actually double this but I'm giving you my Mom's recipe)
1/2 cup of Ground Flax
1 cup of Sunflower Seeds (I love textured and seedy bread best)
1/2 cup of Vegetable Oil
1 TBSP of Salt
1 Egg

Mix. And then add more flour, as much as needed. About 10 - 12 cups.  (I use White and so does my mom at this point because it holds together well.)

This is a tricky part if you have never made bread before. You don't want to add too much flour but if you don't add enough then it won't work either. If you add too much flour then your bread will be really heavy.

 At this point when you are adding flour add it until it is "dough-like" and pulling from the sides of the bowl but don't add so much flour that it isn't sticky any more. Get it?

At this point, let your bread rise 15 minutes.


I forgot about mine and left it for probably 45 minutes and it got a little large...

At this point put a little oil on your counter, get your dough out of the bowl and play with it a little bit. Separate it into 6 - 7 'chunks' of dough. (I use a serrated knife to divide mine). Play with it for a while (important so you get the air bubbles out of it) and shape it into loaves and put it into greased loaf pans. 

Let it rise in a warm place until it has doubled in size and then bake for about 30 minutes at 350 degrees or until it is brown and your whole house smells AMAZING.

When you take your bread out of the oven I like to take my loaves out of the pans right away but if you try to get it out and the bread won't budge then just walk away. The bread will steam itself out of the pan and when it is cool it will just fall right out of the pans when you try.

Eat Hot and with butter or our favorite: Honey Butter...

Just whip equal parts butter and honey and it is honestly WAYYYYYY better than buttering your bread then spreading honey on it. Promise

And sorry, I have no pictures of my bread! I'm terrible! But instead, how about one of my Mom?


She might kill me for posting this picture on here but too bad! Love you Mom!!!!

Click Here


See, I Really Am Back!!! Throw Together Enchiladas

Enchiladas.
I always feel like enchiladas are something I need a recipe for. They sort of scare me. Not the actual eating them but making them always sounds like such a big deal. But I found out, I was wrong!

I was at a friends for a playdate (don't worry, I had kids with me) and while I was there she was getting her dinner ready for that night. She was making enchiladas. And she had no recipe. In fact, she was just putting left overs together and they looked delicious. I decided that if she could do it so could I.

So I thought that I would do it. The next day. And they were AMAZING!
I'm so glad that I wrote down what I was doing as I was doing it because they turned out so good that I knew I had to share. I kind of can't believe that I have another recipe that I made up myself  (with a little inspiration). Maybe I really am back!
I hope so!

Throw Together Enchiladas - Kaycee Style
(oh, and my photos suck...sorry)

This is how I began:

Prepare 2 cups of rice (I was in a hurry so I used my emergency supply of minute rice)

While your rice is cooking get out your best pan for some sautéing fun...

Sauté: (Remember these are 'throw together' so use the veggies that your family likes)
1 Onion
a handful of Sliced Mushrooms
1 clove of Garlic
1 Red Pepper, diced
1 cup of Broccoli in small bite-sized pieces

When all of the above vegggies are soft and smelling amazing add:

1 can of Diced Tomatoes
1 cup of Puréed Pumpkin (I think that this is what made the enchiladas so good. The sweetness of the pumpkin cut the acidity of the tomato and it was good!)
A sprinkle of Mrs. Dash, and Salt and Pepper

Grate some cheese (I used Cheddar) while this all simmers together in goodness.


Find your wraps. Did you know there were wraps involved? There are!

Putting it all together:

Lay out your first wrap.
Add a spoonful or two of rice.
Add some of your sautéed veggies on top.
Sprinkle with cheese.
Wrap up and put it into a greased casserole dish seam side down.

Continue with the rest of your ingredients until your dish is full. If there are any remaining veggies (there should be) cover your enchiladas and then sprinkle with more cheese. (if you don't have any extra veggies then probably throw some spaghetti sauce of salsa over the wraps just to keep them from drying out)

Bake at 350 degrees for about 1 hour.

Eat and be happy!

We liked these so much that I didn't get a pretty picture of this at all but there is a picture at least!


I'm back...and I hope for good!


I'm really sorry.

I have been so bad at posting since moving this past summer that it is pathetic. To be honest, I have not only been bad at posting but I've been torrible (Hazels word for completely awful, she mixed 'horrible' and 'terrible' and I think its quite genius) and even cooking. I have plenty of excuses. I drive everyone in my family around like crazy. That is my main excuse. And the sad thing is that back in Ontario even when I had no time I still found time to cook but here I have had a really hard time trying to get into any routine at all that involves cooking.

Don't worry, I spend plenty of time in my kitchen but it feels so much less like something I love even though I'm in a way more efficient kitchen and it should be. I just need to get myself into a routine and everything else will fall into place.

And this is starting to happen which is maybe why tonight I was able to whip up a fabulous (though I used some cheating ingredient) vegetarian meal that EVERYONE loved and was perfect for a minus bazillion degree winter night.


Kaycee's Ravioli Casserole

Ok, I first have to again admit...I used cheat ingredients for me. I used a packaged sauce mix and that feels like a cheat. sorry... :(

2 packages of fresh (but frozen) vegetarian Ravioli. Ours was stuffed with spinach and cheese. YUM!
1 package of Knorr Parma-Rosa pasta sauce
Fresh Broccoli
Grated Cheddar Cheese
Bread Crumbs

So, since I only had a few minutes between getting Hazel off the bus and leaving to pick Aaron up at work I had to think about how I was going to have dinner ready when I got back. I knew I wanted to do Ravioli with Parma Rosa Pasta sauce but I also knew if I made the pasta before I left it would be dry and really not as good as if I just made it right before I put it on the table. I also knew I was already hungry and that I needed to have dinner ready when we walked in the door so I couldn't even make the sauce ahead and then do the 5 minute pasta...so, what to do.

Quite a predicament.

Ok, so this is what I did and it turned out to be delicious and such a perfect dish for a cold winter night. Comfort food.

Put the frozen pasta into a baking dish.
Cut up your raw broccoli into bite sized pieces and add it to the baking dish.

Prepare your sauce mix according to the direction on the package EXCEPT add an extra cup of milk.

Once the sauce is ready pour it over the pasta and broccoli. Cover the top with grated cheese followed by a sprinkling of bread crumbs.

Bake at 350 for 45 minutes to an hour.

Serve immediately with a side of salad.

Now, as a side note. I know that this is not the cheapest meal but I lucked out at the grocery store last week. I went to get some fresh pasta and there was a whole pile on 50% off because they were at their expiry date. I bought them all and threw them into my freezer. Look for deals like this, they are most likely to be found if you can get to the store first thing in the morning. Good Luck!

And please send me your recipes so I can continue to get back to cooking good food to share with you!


Pureed Pumpkin, I killed the Jack-o-Lanterns!

Ok, so I did something bad...I cooked the kids works of art.
I killed the pumpkins.


AHHH!

I should have taken a picture of the pumpkin post baking. It was scary. But...lets talk about why I killed the pumpkins.

I went to a church activity a while ago that was all about cooking with pumpkins. We tasted some amazing pumpkin soups, pumpkin french toast (really, it was great) and even some delicious pumpkin cheesecake. Cheesecake. I need some. Soon

You may be surprised but the cheesecake wasn't the reason that I decided to kill Jack. It was the soup
Oh, Oh, the soup. 
Two different types of soup. Which I will post later when I make them myself from my killer pumpkin. We also learned how to cook pumpkin from pumpkin. Can you believe it? Who buys a pumpkin to cook it? I think we all only buy pumpkins to carve them. I mean really, who cooks them. 

Well, me.

I decided to try it. I made the kids wait until Halloween morning to carve their pumpkins so that they  wouldn't get all wrinkly and gross. As soon as the kids were ready for bed Halloween night I shut off the lights, brought in the jack-o-lanterns, and turned on the oven. 

And now I have about 20 cups of frozen pureed pumpkin in my freezer (I know, it sounds excessive but then I can eat pumpkin soup, pumpkin cheesecake and pumpkin muffins all I want. And it was really cheap).


How to make Puree Pumpkin

1 pumpkin (as large as you want)

Preheat oven to 350 degrees. 

Slice pumpkin in half and scoop out the seeds (or scoop out the seeds and carve a face). Place on a baking sheet flesh side down, with a little water.

Bake for about 90 minutes or until the flesh is tender. 

When the pumpkin has cooled scoop out the flesh


and mash. Though I tossed it in the blender with a little water and mixed it all up. Then I put it into sandwich bags and then about 6 bags into large zip lock bags and tossed them into the freezer. 


I am all ready for soup season!


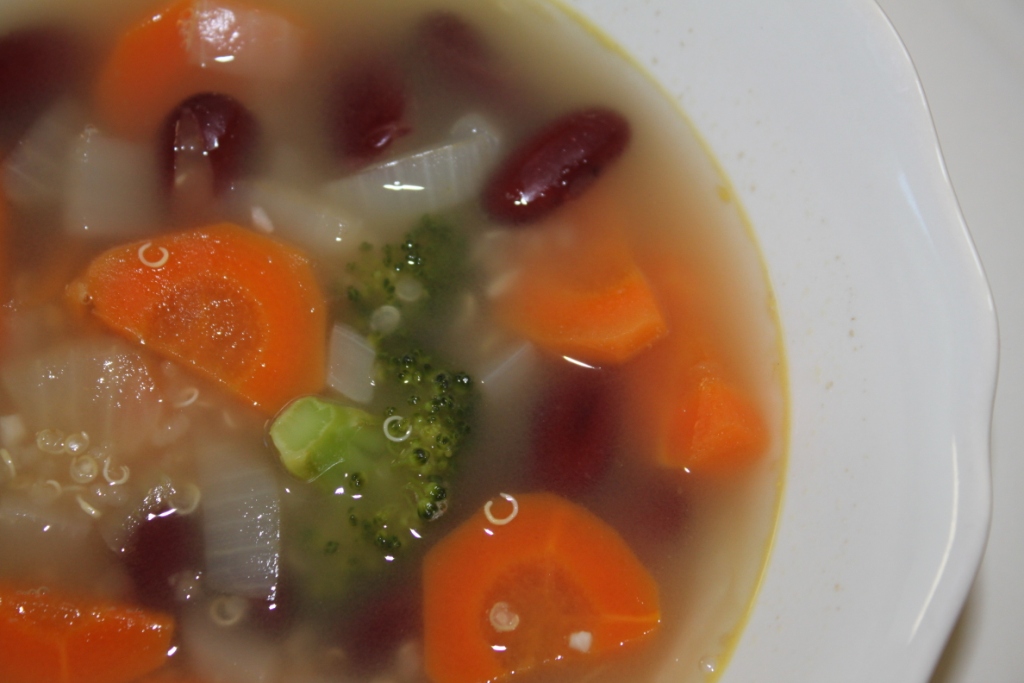
Seconds Please! A New Favorite: Hearty Quinoa & Bean Soup


I love soup. I know you all know this but I really love soup. Soup is one of the best redeeming things about The Fall. I always love trying new soups and so when I received an email for this recipe from Chatelaine a couple of weeks ago ago and I couldn't wait to try it.

But I had to.

I didn't have a couple of the main ingredients so I finally went shopping and I'm so glad that I did.

This soup was delicious! Aaron wasn't in love with it first but was eating it up by the end. The kids didn't love or hate it so that is a good thing right? And let me just add that when I say its a new favorite, I mean its a new favorite for me.

I'm so glad there are leftovers!

Hearty Quinoa & Bean Soup

1 Tbsp of Vegetable Oil (I used Olive, as usual)
1 chopped Onion
1 diced Carrot
2 cloves of Garlic (or 2 tsp of minced garlic)
1 tsp of Cumin (which I missed somehow...)
1/3 cup of dry Quinoa (I thought 1/3 wasn't enough so I used 1/2 cup. That was too much. stick with 1/3)
1 tsp of Coriander
2 cups of Vegetable Broth (I used Chicken because that is what I had)
2 cups of Water
1 can of White Kidney Beans, drained and rinsed (I used Red because that is what I had as I wanted some more color)
2 cups of Baby Spinach (How did I forget to buy spinach?!?! I used Broccoli and it was still great)

Heat a large saucepan over medium.

Add oil, then onion. Cook until onion is soft, about 3 min.
Add carrot, garlic, cumin, coriander and quinoa.

Cook for 2 more min. Pour in broth and 2 cups water. Bring to a boil, then reduce heat to medium-low. Simmer, partially covered, until quinoa is cooked, about 15 more min.

Stir in beans and spinach (or broccoli). Cook until beans are hot and spinach is wilted, 2 to 3 more min.


Serve immediately with warm whole wheat buns and a nice kale and romaine salad.
  • Prep Tip:

    No need to chop the spinach . Just toss it into the simmering soup and it wilts perfectly.


Chocolate Keeps Me Alive; Even With Black Beans

No, really. I do really live to eat chocolate. I love it. oh, I want some right now just thinking about it. Good thing I have a stash or chocolate chip cookies in my freezer right now. 

I eat a lot of chocolate. Perhaps too much? No, never! But I am aware of my addiction so I thought that I'd try to make my sweet tooth a little healthier by trying out some Black Bean Brownies

I had heard of black bean brownies back in Kingston to a friend who also liked healthy, but delicious food. She had had them at a dinner and tried to make them herself at home. She went for an even healthier route than I did, using Agave Nectar instead of sugar. Ever since she told me about these beaney brownies I've wanted to try them. I finally did.

These are gluten free, fast and easy to make. They didn't turn out gooey and fudgey like gluten brownies but with ice cream, they were fabulous. I served them to some unsuspecting lunch guests and they couldn't tell at all they were gluten free or full of beans. So mix some up today and feel a little bit better when you eat the whole pan while watching the latest chick flick. 


Gluten Free Black Bean Brownies

1 19 oz (540 mL) can black beans, drained and rinsed (I like to cook up a whole whack of black beans and keep them in in my freezer in sandwich size zip-topped bags)
1/2 cup sugar 
2 large eggs
1/3 cup butter, melted
1/4 cup cocoa (Fry's in my favorite brand)
2 tsp. vanilla
1/4 tsp. salt
1/2 cup chocolate chips (I skipped these)
1/3 cup chopped walnuts or pecans (I have some walnuts but skipped them this time)

Preheat oven to 350 degrees.
Place the black beans, sugar, eggs, melted butter, cocoa, vanilla and salt in the bowl of a food processor and blend until smooth, pulsing and scraping down the sides of the bowl to ensure all the beans are completely pureed (I threw these in my blender and turned it on high until it was all mixed up).

If adding the chocolate chips and nuts, do it now. Pour into a greased 8x8 baking pan (or a 8' round cake pan if that is all you can find).

Bake for 25-30 minutes, or until slightly puffed (and this really means slightly puffed) and set. 

Cool before cutting and serve (with ice-cream).